In this tutorial, we will learn how to create content. So let’s get started!
Log in to the administration area. You will be re-directed to the ACCOUNT DASHBOARD as shown in the screen below.
Account Dashboard

Click Manage icon. You will be re-directed to the Project Dashboard as shown in the screen below.
Project Dashboard

Click Member Pages. You will be re-directed to the Content Management screen as shown below:
Content Management

Please follow the numbering in the screen above for detailed explanations.
1. Click the (+) icon as shown in the screen above to add content to the site. You will get the following two options:
– Add New Category
– Add New Page
2. Now let’s start with creating a new category.
What is a Category?
Category acts as a container for the content. All the content is mapped to particular category which is further mapped to the membership levels.
For Example – you start a membership course which contains a total of 5 modules. So the suggested first category could be named as Module 1, second category as Module 2 and so on.
Similarly, If your membership course is Week-based, you could name the categories as Week 1, Week 2 and so on.
Click Add New Category. A pop-up for the same will appear as shown below:
Add New Category
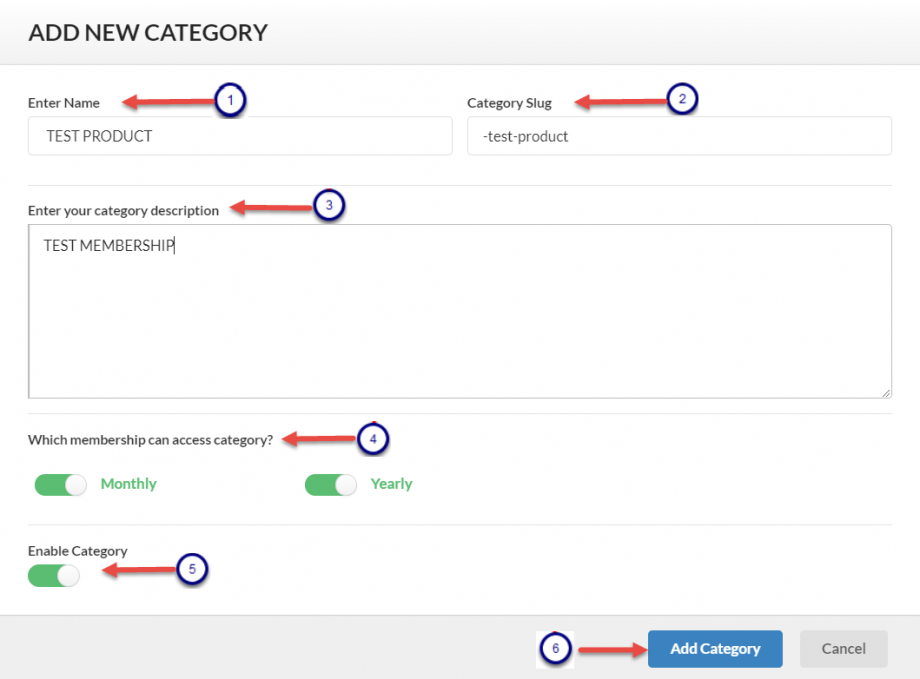

Categories hold the site content that can be accessed only by the paid members. Categories can be mapped to any number of membership levels. So, if your membership site has multiple membership levels, create one or more categories for each level as per your requirements.
We created two Membership levels in the first step of the site wizard – Yearly and Monthly (as appearing in the screen above)
Please follow the numbering in the screen above for detailed explanations.
1. Name: Enter a title name for the category here.
2 Category slug: It is a URL friendly name of the title. This will be auto-typed when you create the name of the category.
3. Category Description: Give a brief description of the category in this section.
4. Category Mapping: Choose the membership levels with which you want this category to be mapped. you can choose any number of membership levels.
5. Enable Category: Click the enable icon to enable the category
6. Add Category: Once you have filled in all the details, click Add category.
You will be redirected to the Content Management screen. The created category will now be showing in the Content Management list as shown below:
Edit/ Delete Category
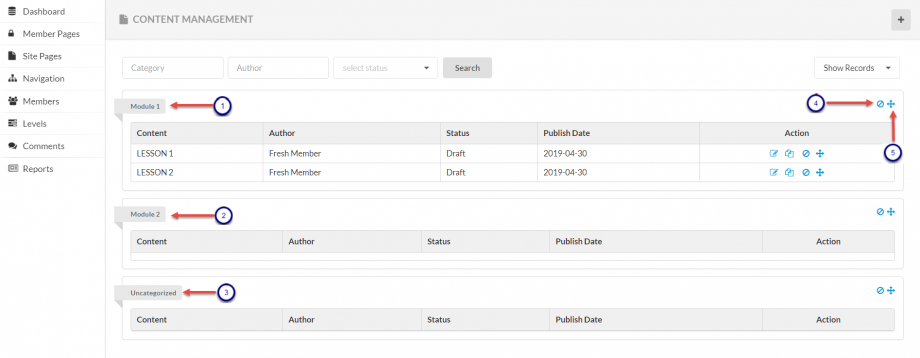

Please follow the numbering in the screen above for detailed explanations:
1. The first category created shows here. Click Module 1 to edit this category.
2. The second category created shows here. Click Module 2 to edit this category.
You may create any number of categories and name them as per your convenience.
3. Uncategorized category: This category is a by-default creation in the system. So in case a page is created, when there is no category created yet, the page content will show in the unrecognized category section.
4. Delete icon: Click this icon to delete the created category. The system will reconfirm the deletion through a pop-up. Click Yes to re-confirm the deletion.
5. Reorder icon: Click this to reorder the list of the categories in the content management section.
Now let’s start adding content to these categories. In the Content Management section, click Add New Page on the top right of the screen as shown below:
Add New Page

You will be re-directed to the New Page section as shown below:
 Please follow the numbering in the screen above for detailed explanations.
1. Page Title: Give a title to the content page here.
2. Page URL: This is a user-friendly slug name for the content. This will auto-typed when you set the page title.
3. Text Editor: The marked area is the text editor. You can edit your content by using various options in the editor. Image uploads and embedded videos can also be added in your content.
4. Description: This is the main content area of the page section. You can add content here. Use various options from the text editor to edit the content.
5. Page Status: Select the status of content. (Draft, Pending, Published)
– Draft: This implies the content is in draft stage and yet to be completed.
– Pending: This implies the content is completed but not yet published.
– Published: This implies the content is in published status.
6. Publish: Select a date to publish the content.
7. Drip Feed Settings:
No- The post will be accessible by members instantly after signing up.
Yes- Select the number of days after which, the post can be accessible to members. You can schedule content for up to 5 years!
8. Site Videos: You can upload videos to the page in the text editor. The same will appear in the drop-down on the right side of the screen. Please note that the system only accepts the mp4 formats.
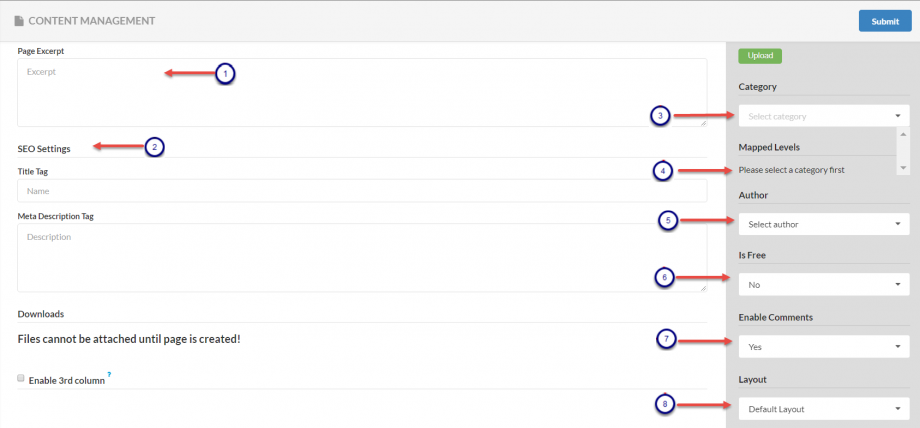

Please follow the numbering in the screen above for detailed explanations.
1. Page Excerpt: Enter a brief summary of the content of the page.
2. SEO Settings: Search engine optimization (SEO) is the process affecting the visibility of a website or a web page in a search engine’s “natural” or un-paid (“organic”) search results.
– Title Tag: Enter a title of the content which will be used for SEO search.
– Meta Description Tag: Give a brief description of the content which you want to use for SEO inclusive of any keywords which you want to use for SEO.
3. Category: The categories that you just created will show in the drop-down list in this field. Choose the Category with which you want to map the content of this page.
4. Mapped Levels: Once you select your choice of category, this section will by-default show the membership level with which the category is mapped. The example is shown in the next screen.
5. Author: Author is the person who will appear as the owner of the content on the page. The list of administrators added in the user management section of the site wizard will show in the drop-down. You can also add a member as a site author separately.
6. Is Free: If you want the content to be freely downloadable/accessible, select Yes or else select No.
7. Enable Comments: Select Yes If you want to enable comments for the content. In case you don’t want members to comment on your post, select No.
8. Layout: Select the layout option from drop down. The field comes with 2 layout options: Default Layout and Full- width Layout.

Please follow the numbering in the screen above for detailed explanations.
1. Mapped Levels: As you can see in the screen above, once a particular category is selected, the mapped membership level will be displayed by default.
2. Downloads: This field allows you to attach pdf, zip. or .txt files to the content in the page.
Note: the option to attach the files will be available once the page is created (saved). The details regarding this field are explained ahead.
3. Submit: When you complete the content, click Submit to save.
The page will be refreshed. Going back to the Downloads field (2).
The refreshed page will now give the option to upload pdf, zip. or .txt files to the content as shown in the screen below:
Add New Page – Downloads

Click Browse and upload the files from your system. The screen will look similar to the screen below:

Please follow the numbering in the screen above for detailed explanations:
1. Delete: The downloaded file will be shown here. Click Delete to delete the file.
2. Browse: Click Browse to upload more files.
3. Update: Once you have made all the changes, click Update to save the changes to the record.
4. Preview: Click Preview if you want a preview of this page post on the site.
Click Member Pages on the top left side of the screen to get back to the Content Management page.
The created page post will now show under the chosen category on the Content Management page as shown below:

Please follow the numbering in the screen above for detailed explanations:
1. Edit Page icon: Click this icon to edit and update the page.
2. Delete Page icon: Click this icon to delete the page. The system will reconfirm the deletion through a pop-up. Click Yes to re-confirm the deletion.
3. Re-order Page icon: Use this icon to drag and drop content between different categories. You may also manually move them by opening them in the edit mode.
With this, we complete the tutorial for creating content in Fresh Member.
Leave A Comment?